onlykey-cli
OnlyKey-cli - A command line interface to the OnlyKey (Similar functionality to OnlyKey App) that can be used for configuration, scripting, and testing.
Installation
Windows Stand-Alone EXE
No install is required. Download and run the EXE to open OnlyKey CLI interactive mode or run directly from command line like this:
C:\ onlykey-cli.exe getlabels
Windows Install with dependencies
1) Python 3.8 and pip3 are required. To setup a Python environment on Windows we recommend Anaconda https://www.anaconda.com/download/#windows
2) From an administrator command prompt run:
pip3 install hidapi==0.9.0 onlykey
You should see a message showing where the executable is installed. This is usually c:\python39\scripts\onlykey-cli.exe
MacOS Install with dependencies
Python 3.8 and pip3 are required. To setup a Python environment on MacOS we recommend Anaconda https://www.anaconda.com/download/#macos
$ brew install libusb
$ pip3 install onlykey
Linux/BSD Install with dependencies
In order for non-root users in Linux to be able to communicate with OnlyKey a udev rule must be created as described here.
Ubuntu Install with dependencies
$ sudo apt update && sudo apt upgrade
$ sudo apt install python3-pip python3-tk libusb-1.0-0-dev libudev-dev
$ pip3 install onlykey
$ wget https://raw.githubusercontent.com/trustcrypto/trustcrypto.github.io/pages/49-onlykey.rules
$ sudo cp 49-onlykey.rules /etc/udev/rules.d/
$ sudo udevadm control --reload-rules && udevadm trigger
Debian Install with dependencies
$ sudo apt update && sudo apt upgrade
$ sudo apt install python3-pip python3-tk libusb-1.0-0-dev libudev-dev
$ pip3 install onlykey
$ wget https://raw.githubusercontent.com/trustcrypto/trustcrypto.github.io/pages/49-onlykey.rules
$ sudo cp 49-onlykey.rules /etc/udev/rules.d/
$ sudo udevadm control --reload-rules && udevadm trigger
RedHat Install with dependencies
$ yum update
$ yum install python3-pip python3-devel python3-tk libusb-devel libudev-devel \
              gcc redhat-rpm-config
$ pip3 install onlykey
$ wget https://raw.githubusercontent.com/trustcrypto/trustcrypto.github.io/pages/49-onlykey.rules
$ sudo cp 49-onlykey.rules /etc/udev/rules.d/
$ sudo udevadm control --reload-rules && udevadm trigger
Fedora Install with dependencies
$ dnf install python3-pip python3-devel python3-tkinter libusb-devel libudev-devel \
              gcc redhat-rpm-config
$ pip3 install onlykey
$ wget https://raw.githubusercontent.com/trustcrypto/trustcrypto.github.io/pages/49-onlykey.rules
$ sudo cp 49-onlykey.rules /etc/udev/rules.d/
$ sudo udevadm control --reload-rules && udevadm trigger
OpenSUSE Install with dependencies
$ zypper install python3-pip python3-devel python3-tk libusb-1_0-devel libudev-devel
$ pip3 install onlykey
$ wget https://raw.githubusercontent.com/trustcrypto/trustcrypto.github.io/pages/49-onlykey.rules
$ sudo cp 49-onlykey.rules /etc/udev/rules.d/
$ sudo udevadm control --reload-rules && udevadm trigger
Arch Linux Install with dependencies
$ sudo pacman -Sy git python3-setuptools python3 libusb python3-pip
$ pip3 install onlykey
$ wget https://raw.githubusercontent.com/trustcrypto/trustcrypto.github.io/pages/49-onlykey.rules
$ sudo cp 49-onlykey.rules /etc/udev/rules.d/
$ sudo udevadm control --reload-rules && udevadm trigger
FreeBSD Install with dependencies
See forum thread here
QuickStart
Usage: onlykey-cli [OPTIONS]
Setup Options
init
A command line tool for setting PIN on OnlyKey (Initial Configuration)
General Options
version
Displays the version of the app
fwversion
Displays the version of the OnlyKey firmware
wink
OnlyKey flashes blue (winks), may be used for visual confirmation of connectivity
getlabels
Returns slot labels
settime
A command for setting time on OnlyKey, time is needed for TOTP (Google Authenticator)
getkeylabels
Returns key labels for RSA keys 1-4 and ECC keys 1-16
rng [type]
Access OnlyKey TRNG to generate random numbers:
- [type] must be one of the following:
- hexbytes - Output hex encoded random bytes. Default 8 bytes; Maximum 255 bytes. Specify number of bytes to return with –count
i.e. 'onlykey-cli rng hexbytes --count 32' - feedkernel - Feed random bytes to /dev/random.
- hexbytes - Output hex encoded random bytes. Default 8 bytes; Maximum 255 bytes. Specify number of bytes to return with –count
OnlyKey Preferences Options
idletimeout [num]
OnlyKey locks after ideletimeout is reached (1 – 255 minutes; default = 30; 0 to disable). More info
wipemode [num]
Configure how the OnlyKey responds to a factory reset. WARNING - Setting to Full Wipe mode cannot be changed. 1 = Sensitive Data Only (default); 2 = Full Wipe (recommended for plausible deniability users) Entire device is wiped. Firmware must be reloaded. More info
keylayout [num]
Set keyboard layout
- 1 - USA_ENGLISH (Default)
- 2 - CANADIAN_FRENCH
- 3 - CANADIAN_MULTILINGUAL
- 4 - DANISH
- 5 - FINNISH
- 6 - FRENCH
- 7 - FRENCH_BELGIAN
- 8 - FRENCH_SWISS
- 9 - GERMAN
- 10 - GERMAN_MAC
- 11 - GERMAN_SWISS
- 12 - ICELANDIC
- 13 - IRISH
- 14 - ITALIAN
- 15 - NORWEGIAN
- 16 - PORTUGUESE
- 17 - PORTUGUESE_BRAZILIAN
- 18 - SPANISH
- 19 - SPANISH_LATIN_AMERICA
- 20 - SWEDISH
- 21 - TURKISH
- 22 - UNITED_KINGDOM
- 23 - US_INTERNATIONAL
- 24 - CZECH
- 25 - SERBIAN_LATIN_ONLY
- 26 - HUNGARIAN
- 27 - DANISH MAC
- 28 - US_DVORAK
keytypespeed [num]
1 = slowest; 10 = fastest [7 = default] More info
ledbrightness [num]
1 = dimmest; 10 = brightest [8 = default] More info
touchsense [num]
Change the OnlyKey’s button touch sensitivity. WARNING: Setting button’s touch sensitivity lower than 5 is not recommended as this could result in inadvertent button press. 2 = highest sensitivity; 100 = lowest sensitivity [12 = default]
2ndprofilemode [num]
Set during init (Initial Configuration) to set 2nd profile type 1 = standard (default); 2 = plausible deniability
storedkeymode [num]
Enable or disable challenge for stored keys (SSH/PGP) 0 = Challenge Code Required (default); 1 = Button Press Required More info
derivedkeymode [num]
Enable or disable challenge for stored keys (SSH/PGP) 0 = Challenge Code Required (default); 1 = Button Press Required More info
hmackeymode [num]
Enable or disable button press for HMAC challenge-response 0 = Button Press Required (default); 1 = Button Press Not Required. More info
backupkeymode [num]
1 = Lock backup key so this may not be changed on device WARNING - Once set to “Locked” this cannot be changed unless a factory reset occurs. More info
sysadminmode
Enable or disable challenge for stored keys (SSH/PGP) 0 = Challenge Code Required (default); 1 = Button Press Required More info
lockbutton
Enable or disable challenge for stored keys (SSH/PGP) 0 = Challenge Code Required (default); 1 = Button Press Required More info
Slot Config Options
setslot [id] [type] [value]
- [id] must be slot number 1a - 6b for OnlyKey or 1-24 for OnlyKey DUO
- [type] must be one of the following:
- label - set slots (1a - 6b) to have a descriptive label i.e. My Google Acct
- url - URL to login page
- delay1 - set a 0 - 9 second delay
- addchar1 - Additional character before username 1 for TAB, 0 to clear
- username - Username to login
- addchar2 - Additional character after username 1 for TAB, 2 for RETURN
- delay2 - set a 0 - 9 second delay
- password - Password to login
- addchar3 - Additional character after password 1 for TAB, 2 for RETURN
- delay3 - set a 0 - 9 second delay
- addchar4 - Additional character before OTP 1 for TAB
- 2fa - type of two factor authentication
- g - Google Authenticator
- y - Yubico OTP
- u - U2F
- totpkey - Google Authenticator key
- addchar5 - Additional character after OTP 2 for RETURN
wipeslot [id]
- [id] must be slot number 1a - 6b for OnlyKey or 1-24 for OnlyKey DUO
Key Config Options
setkey [key slot] [type] [features] [hex key]
Sets raw private keys and key labels, to set PEM format keys use the OnlyKey App
- [key slot] must be key number RSA1 - RSA4, ECC1 - ECC16, HMAC1 - HMAC2
- [type] must be one of the following:
- label - set to have a descriptive key label i.e. My GPG signing key
- x - X25519 Key Type (32 bytes)
- n - NIST256P1 Key Type (32 bytes)
- s - SECP256K1 Key Type (32 bytes)
- 2 - RSA Key Type 2048bits (256 bytes)
- 4 - RSA Key Type 4096bits (512 bytes)
- h - HMAC Key Type (20 bytes)
- [features] must be one of the following:
- s - Use for signing
- d - Use for decryption
- b - Use for encryption/decryption of backups
- For setting keys see examples here.
genkey [key slot] [type] [features]
Generates random private key on device
- [key slot] must be key number ECC1 - ECC16 (only ECC keys supported)
- [type] must be one of the following:
- x - X25519 Key Type (32 bytes)
- n - NIST256P1 Key Type (32 bytes)
- s - SECP256K1 Key Type (32 bytes)
- [features] must be one of the following:
- s - Use for signing
- d - Use for decryption
- b - Use for encryption/decryption of backups
- For generating key see example here.
wipekey [key id]
Erases key stored at [key id]
- [key id] must be key number RSA1 - RSA4, ECC1 - ECC16, HMAC1 - HMAC2
FIDO2 Config Options
ping
Sends a FIDO2 transaction to the device, which immediately echoes the same data back. This command is defined to be a uniform function for debugging, latency and performance measurements (CTAPHID_PING).
set-pin
Set new FIDO PIN, this is the PIN entered via keyboard and used for FIDO2 register/login (not the OnlyKey PIN entered on device).
change-pin
Change FIDO PIN, this is the PIN entered via keyboard and used for FIDO2 register/login (not the OnlyKey PIN entered on device, to change that PIN use the OnlyKey Desktop App).
credential [operation] [credential ID]
- [operation] must be one of the following:
- info - Display number of existing resident keys and remaining space.
- ls - List resident keys.
- rm [credential ID] - Remove resident keys, example here.
reset
Reset wipes all FIDO U2F and FIDO2 credentials!!! It is highly recommended to backup device prior to reset.
Running Command Options
You can run commands in two ways:
1) Directly in terminal
Like this:
$ onlykey-cli getlabels

Slot 1a:
Slot 1b:

Slot 2a:
Slot 2b:

Slot 3a:
Slot 3b:

Slot 4a:
Slot 4b:

Slot 5a:
Slot 5b:

Slot 6a:
Slot 6b:

$ onlykey-cli setslot 1a label ok
Successfully set Label
$ onlykey-cli getlabels

Slot 1a: ok
Slot 1b:

Slot 2a:
Slot 2b:

Slot 3a:
Slot 3b:

Slot 4a:
Slot 4b:

Slot 5a:
Slot 5b:

Slot 6a:
Slot 6b:
2) Interactive Mode
Or you can run commands in an interactive shell like this:
$ onlykey-cli
OnlyKey CLI v1.2.8
Press the right arrow to insert the suggestion.
Press Control-C to retry. Control-D to exit.

OnlyKey> getlabels

Slot 1a:
Slot 1b:

Slot 2a:
Slot 2b:

Slot 3a:
Slot 3b:

Slot 4a:
Slot 4b:

Slot 5a:
Slot 5b:

Slot 6a:
Slot 6b:

OnlyKey> setslot 1a label ok

Successfully set Label

OnlyKey> getlabels

Slot 1a: ok
Slot 1b:

Slot 2a:
Slot 2b:

Slot 3a:
Slot 3b:

Slot 4a:
Slot 4b:

Slot 5a:
Slot 5b:

Slot 6a:
Slot 6b:

OnlyKey> setslot 1a url accounts.google.com

Successfully set URL

OnlyKey> setslot 1a addchar1 2

Successfully set Character1

OnlyKey> setslot 1a delay1 2

Successfully set Delay1

OnlyKey> setslot 1a username onlykey.1234

Successfully set Username

OnlyKey> setslot 1a addchar2 2

Successfully set Character2

OnlyKey> setslot 1a delay2 2

Successfully set Delay2

OnlyKey> setslot 1a password

Type Control-T to toggle password visible.
Password: *********
Successfully set Password

OnlyKey> setslot 1a addchar3 2

Successfully set Character3

OnlyKey> setslot 1a delay3 2

Successfully set Delay3

OnlyKey> setslot 1a 2fa g

Successfully set 2FA Type

OnlyKey> setslot 1a totpkey

Type Control-T to toggle password visible.
Password: ********************************
Successfully set TOTP Key

OnlyKey> setslot 1a addchar4 2

Successfully set Character4

OnlyKey>

Bye!
Examples
Writing Private Keys and Passwords
Keys/passwords are masked when entered and should only be set from interactive mode and not directly from terminal. Entering directly from terminal is not secure as command history is stored.
Setkey Examples
To set key a device must first be put into config mode.
Set HMAC key 1 to a custom value
$ onlykey-cli
OnlyKey> setkey HMAC1 h
Type Control-T to toggle password visible. Password/Key: **************
Successfully set ECC Key
HMAC key must be 20 bytes, h is HMAC type
Set HMAC key 2 to a custom value
$ onlykey-cli
OnlyKey> setkey HMAC2 h
Type Control-T to toggle password visible. Password/Key: **************
Successfully set ECC Key
HMAC key must be 20 bytes, h is HMAC type
Set ECC key in slot ECC1 to a custom value (Slots ECC1-ECC16 are available for ECC keys. Supported ECC curves X25519(x), NIST256P1(n), SECP256K1(s))
$ onlykey-cli
OnlyKey> setkey ECC1 x
Type Control-T to toggle password visible. Password/Key: *********************
Successfully set ECC Key
ECC key must be 32 bytes, x is X25519 type
Genkey Examples
To set key a device must first be put into config mode.
Generate ECC key in slot ECC1 to a custom value (Slots ECC1-ECC16 are available for ECC keys. Supported ECC curves X25519(x), NIST256P1(n), SECP256K1(s))
$ onlykey-cli
OnlyKey> genkey ECC1 x
Successfully set ECC Key
Scripting Example
Set time on OnlyKey (required for TOTP)
$ onlykey-cli settime
This can be added to scripts such as the UDEV rule to automatically set time when device is inserted into USB port. See example here
Scripted provisioning of an OnlyKey slots and keys can be done by creating a script that sets multiple values on OnlyKey
List and Remove FIDO2 Resident Key
List current resident keys:
onlykey-cli credential ls
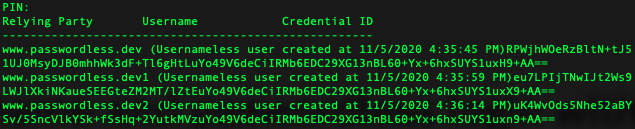
Remove a resident key by credential ID
onlykey-cli credential rm eu7LPIjTNwIJt2Ws9LWJlXkiNKaueSEEGteZM2MT/lZtEuYo49V6deCiIRMb6EDC29XG13nBL60+Yx+6hxSUYS1uxX9+AA==
Once removed, list current resident keys to verify:
